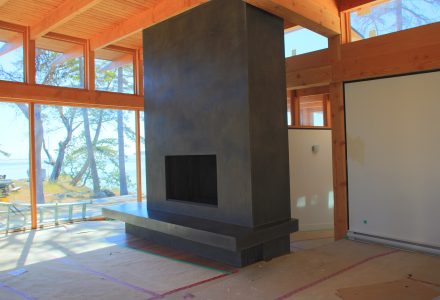
Integrated Italian Lime Plaster Fireplace from darrell morrison on Vimeo.
Tadelakt pillars inside and out, Fibercrown mouldings installed by and painted to resemble limestone. Italian lime plaster inside and out, antique mouldings, stencils, lath and plaster domes finished in silver leaf even the fountain base was finished by our hands. This house will be one to beat in our book of projects, a true masterpiece and an amazing group of people pulled this all together.
Italian Villa Lime Plaster Full Interior & Exterior Vancouver BC from darrell morrison on Vimeo.
Tadelakt pillars inside and out, Fibercrown mouldings installed by and painted to resemble limestone. Italian lime plaster inside and out, antique mouldings, stencils, lath and plaster domes finished in silver leaf even the fountain base was finished by our hands. This house will be one to beat in my book of projects, a true master piece and an amazing group of people pulled this all together.
-The Villa Work Performed-
-Exterior-
Two tone venetian lime plaster exterior
Install all fibercrown foam mouldings on exterior of house including arches windows and base.
Lime paint all mouldings to resemble lime stone
Tri-color Tadelakt lime plaster pillars
-Interior-
Smooth Venetian plaster walls including all ceilings and walls throughout house
Main interior fireplace install fibercrown, float substrate plaster to resemble walls and carved limestone
Plaster pillars and arches in Tadelakt with glaze and wax for an aged look
All domes finished in lath and plaster then decorated with silver leaf.
All wood beams on interior wood grained
We recently finished this detailed interior using venetian plaster in this beautiful traditional home, infused with tuscan details. The owners wanted a house built using environmentally safe products, however they were not aiming for LEED points. We used low voc colorants designed for this project and soap wax’s for sealing all the surfaces. Venetian plaster is a great alternative to paint materials as its surface does not show ware easily and its depth and beauty spark conversation. All the ceilings throughout the project were finished with a 2 tone Tadelakt lime plaster. The base boards, crown mouldings and stair kicks are finished in a pitted plaster finish to give the look of solid stone. I hope you enjoy viewing this project just as much as we enjoyed helping create it.
Here is one of the projects we have completed over the last year and since we completed this Tuscan Villa in Tadelakt, we designed over 19 different shades and formulations of finishes for this amazing Tuscan villa. The Tadelakt installation was not your normal install, as we created lots of texture and old world charm with the techniques. Working on this project was a true treat as I was able to express full creativity showcasing some of my best work and crazy ideas. Hope you enjoy these photos of a full interior in Ventian Lime based plaster.
Thanks for looking.
The process, the projects, the finished product: This is an inside look into how I create my Venetian plaster projects, making them come alive.
In this video, you’ll see steps used to create my Venetian plaster projects, including completed project photos of Classic, Carrara, Intonachino and Tadelakt plaster applications.
When it comes to my projects, it’s Stucco Italiano Italian lime plaster that is my one and only choice, and I think this video shows you why. When you think interior stucco think Authentic lime based Venetian plaster.
Its not everyday your dreams come true, this week for me they did. I have been dreaming of lime plastering this house for quite sometime and starting June 1st I get to do just that.
Not only are we Lime plastering this entire Tuscan villa, we also will be applying Tadelakt Lime plaster to all the columns and Lime painting all the fiber crown trim and moulding details of the full exterior. This home is going from new to old in a matter of a few months.
Be sure to check back in the coming weeks as this Italian lime plaster exterior unfolds
Well, we’re already three weeks into our massive Italian lime plaster commercial project in South Surrey, BC.
As you can imagine, a lot of work is going on around us on the project every day, so while we’re trying to keep productivity at a maximum, we also have to keep trade damage to our work at a minimum.
This week, focus has been on the main floor’s lobby, the corridors, ceilings, and that awesome barrel ceiling covered in Venetian plaster.
It’s a big challenge, a ceiling like that, but to know me is to know I love my job.
Everyone around me knows how much I dig the challenges and the change that come from project to project. My passion for what I do and for getting my clients what they want is what makes my work so successful.
This one’s got even more challenges, and people to satisfy, than anything I’ve done because it’s the largest project I’ve ever worked on, and I hope it proves I belong on both the artisan and big commercial side of plastering.
This barrel ceiling’s a huge focal point, so I took extra care and due diligence, as it’s a heavy use area and we want it looking as fantastic years from now as it does opening day.
To get there, I started off by applying a two-coat Intonachino Lime plaster finish, and closed it up with a buffed super-smooth finish.
When you’re talking a “true” Venetian plaster, it’s actually a very thin finish. It can be somewhat delicate, and that’s something to consider on a project like this versus, say, a large home for a family of four. Given the massive building size, and the likelihood of foundation settling over coming months or years, I wanted a thicker plaster, just in case the building shifts any or nails decide to move any, and that extra coverage (and more work) should ensure longevity.
Craziness, I know, but it’s better safe than sorry, and it’s easier to do the job thoroughly the first time than to fix any problems a year or five years down the line.
Make sure your craftsmen don’t just think about how your job looks the day you have to sign the last check. You want them thinking about how that space will work for you over the coming years. Have that conversation with them, if you’re not sure they’re thinking in those terms — because they should be.
Look at this colour depth! This is what happens when I really push the envelope on the “maximum tint allowance” per bucket. Pay-off!
“Wax-on, wax-off.” Laying down the layers, pic by pic:
The end result? A stunning shiny show-stopper.
In this instance, it’s really a labour of love. It’s nine steps from start to finish — a lot of prepping, buffing, and grunt-work. There’s no easy way out on this one, it’s all about pushing through the burn thats the true nature of real venetian plaster.
At the end, all you see is how great it looks, and that’s okay with me.
Cheers,
Darrell Morrison.
Lime plaster has been my choice of material for almost a decade now. Recently someone told me it takes 10,000 hours to become proficient at any trade whether it be carpentry, framing or even a stone mason, the time spent honing that skill will one day make you a tradesman (or tradeswoman).
Over the summer I have been fortunate to work on a project in an Old World Italian Design Tuscan Villa. Breaking into my crate of techniques from WoodGraining, GoldLeafing, Venetian Plastering, Lime Painting and Stencilling. I have been challenged in ways that excite my mind and creativity, opening a new chapter in my life and the world I love to call Italian Plastering.
Here are some photos from this recent journey, the project is still in progress.
Fibre Crown is a foam moulding used to simulate stone and in most situations is painted with acrylic paints.
Here is a close up of the foam moulding
Lime Painted Fibre Crown Moulding To Simulate The Look Of LimeStone
If you know me, you know I’m a busy guy. It’s work, work, work, these days, and when it’s not about work, it’s about time with my wife, my girl, and the pups.
Needless to say, like most of us, I seldom get to do the projects around the home that I dream of doing.
That all changed in the last month, because not only did I finally get to do a bit of home reno that my family gets to enjoy, but I also got to try something I’ve wanted to do for a really long time — a heavy-duty Italian venetian plaster treatment to a bathroom shower stall.
This work was done in our main-floor bathroom, which had been wanting TLC for a while.
Doing any project for the first time, especially when it’s a bathroom, can make it hard to estimate all the work involved, so getting a chance to explore the process on my own time was great.
It was a major project by the time I finished, as you can tell by the end results, but what did it take to get there?
Here’s how the Home Shower Venetian Plaster Project evolved, start to finish.
This ’70s bathroom came with tons of cedar, which all had to come down. Luckily, it was installed by someone who didn’t make much effort to do it right, so only a couple nails in each board ensured they popped right off. Removing the shoddy work made investing time in improving the room that much more satisfying.
The first thing I wanted to do was move the shower-head up by about two feet. No one wants to crouch for a shower.
Before now, I never had the need, or an opportunity, to work with copper. I decided I’d take a kick at the copper can instead of calling a plumber, and working with the pipes was easier than I expected. I might do the odd fix-it job here and there now, but I’d certainly never do my whole place.
Next, I installed plywood. I’m sure some of you building guys out there are wondering “why not concrete board instead of plywood?”
It’s a preference, really. I find plywood’s just easier to work with, and it comes in big old 4×8-foot sheets, making for less cutting in some situations, but, most importantly, I find plywood’s a big help when it comes to installing lath. (Shown later.)
Next up was installing the water-proof membrane. Obviously a quality project is needed for a shower, and I used a local company’s product, called, “SuperSeal” you can learn more about it here.
The trip home from Banff, Alberta, was an amazing seasonal drive. As I dropped from the Rocky Mountain highs to the Okanagan, then sea level, I saw things go from end-of-winter to lush and green, full of spring life.
I greatly enjoyed experiencing all four “seasons” this year, thanks to my cold-season work in the mountains and Alberta. It was mostly rain and a really mild winter in Vancouver, not one of our best years, but also not that unusual. It was a good time for a wintery change of scenery, but it’s nice (if a little soggy) to be home.
I’m getting back to making the rounds and taking on local projects. This past week, my team worked on two Valley projects — one in Maple Ridge and the other in Langley. The lengthy drives between home and the two projects took some adjusting, but it’s a great place to drive.
We just finished work on this smaller “feature” barrel ceiling’s plaster treatment. It’s one of those little jobs that starts and finishes quickly.
Italian Venetian plaster like this is where I began working in this trade, and those days kicked off what I hope will be a long and great career. It’s a real treat to work where I got my roots.
Smaller projects like this are always fun, too. Seeing the end result more quickly is a great pay-off compared to the visual impact but long work stint that doing a huge project comes with. I enjoy having a mix of both kinds of jobs.
Decorative Paint & Plaster is back in town and we’re booking clients for the next two years. How can we help you?